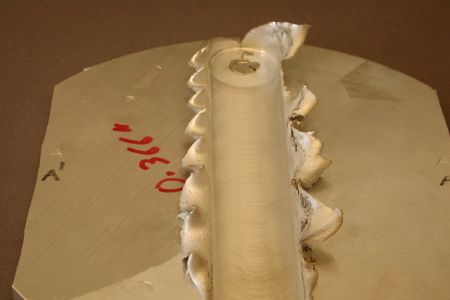
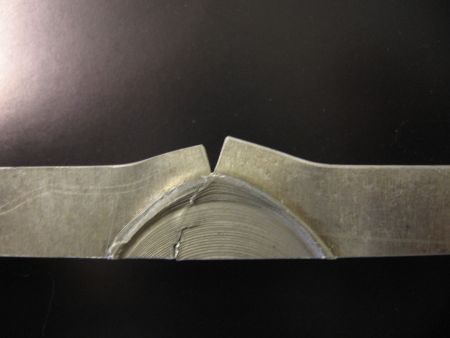
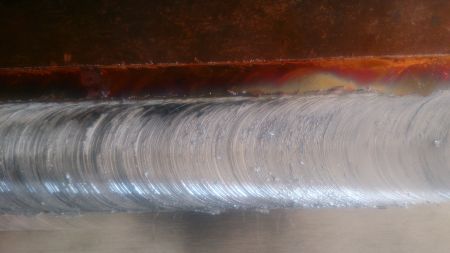
Surface morphology
Surface morphology is a subset of analytical imaging to describe the macroscopic and microscopic appearance of the top surface friction stir welds
In some cases, high spatial resolution imaging made with sophisticated microscopes is used to produce images of products, samples and objects that cannot be seen with the naked eye.
FSW of steel
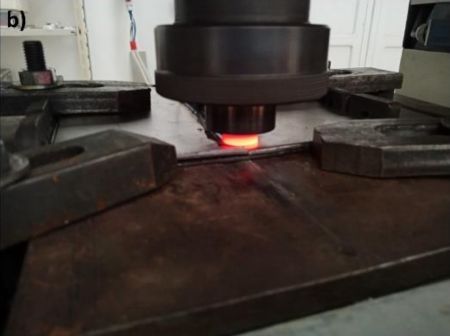
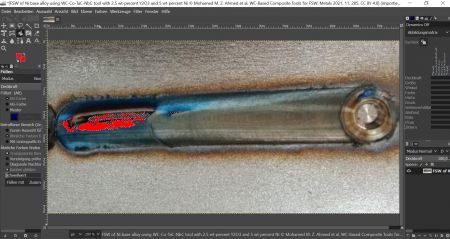
Friction stir welding (FSW) of Ni base alloy and of carbon steel was conducted during the development of WC-based composite tools for FSW of high-softening-temperature materials at the Prince Sattam Bin Abdulaziz University in Saudi Arabia and the Suez University in Egypt et al.[1]
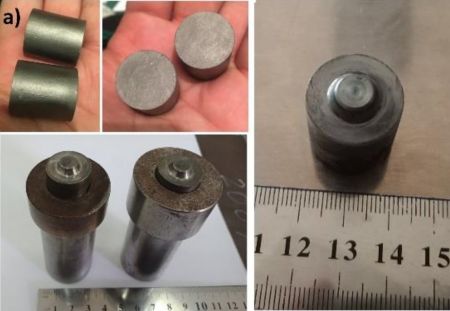
The FSW tool was made from WC-based composites with 5 wt% Ni and 2.5 wt% Y2O3.[1]
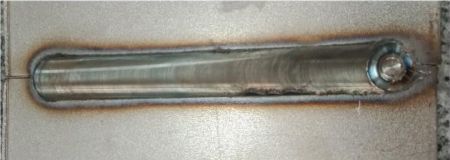
A visually acceptable weld shows a homogeneous surface from the start to the stop. The annealing colors above the heat affected zone are superficial colorations that result from the application of heat. They can be used on some materials such as stainless steels and copper alloys to assess and monitor the heat input during and even after FSW.
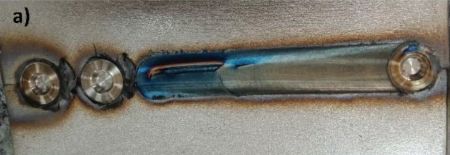
If large surface breaking voids, as at the start of this weld, or small surface breaking voids are visible, as at near the middle of this weld, the weld does not meet the acceptance criteria described in ISO 25239-1:2020(en) — Part 5: Quality and inspection requirements, which is, strictly speaking, only applicable to aluminium.[2]
Image processing with Fuzzy Select Tool (Magic Wand) in GIMP 2.10 (GNU Image Manipulation Program). This is a pixel-based graphics software that includes functions for image editing and digital painting of raster graphics. The programm can be downloaded and used free of charge. Several YouTube videos are available, which explain its main features.
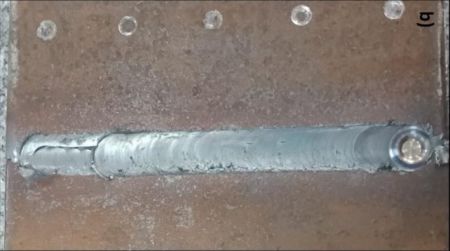
When welding carbon steel the annealing colors are less visible as shown here on a weld that shows some surface anomalities at the start.
Flash generation during FSW of 7050-T651
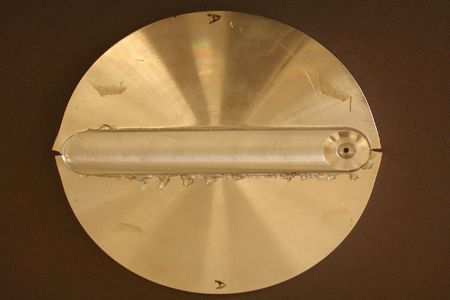
A study on friction stir welding of 10mm thialuminum-scandium alloy 7050-T651 castings (Al–5.6Zn–2.5Mg–1.6Cu) alloyed with 0.12 wt.% scandium was conducted at University of Applied Sciences of Southern Switzerland. The welds were made at a travel speed of 140 mm/min. The pin length was approximately 9.5 mm and the rotation speed was 240 rpm. Weld A was made as cast with acceptable visual appearance.[3]
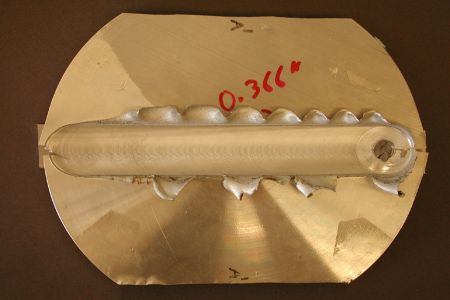
Flash was expelled, while making weld A' in the artificially aged T651 condition.
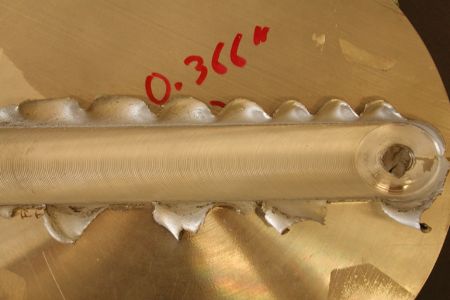
The flash was different on the advancing and retreating side of the weld. Gerenerating excessive flash is not a problem per se, as the flash can easily be removed with a milling cutter in the FSW machine or a grinding wheel of a manually operated angle grinder. However, in some cases excessive flash might be an indication for undercut, i.e. the weld being thinner than the plates, or for the pin being damaged by contacting the backing bar.
Above photo shows the flash from a different point of view. Therefore, some FSW machines have several cameras installed, e.g. one in front of the FSW tool and two behind the FSW tool (looking at the weld from above and at an angle).
Significant deformation occured in the start region of the weld, so that the unwelded region is clearly visible in the area, which had not been stirred by the traversing pin.
5 mm thick EN AW-3004 (AlMn1Mg1)
The purpose of a study of Anna Janeczek, Jacek Tomków and Dariusz Fydrych was to compare the effect of the shape of a tool on the joint and to obtain the values of Friction Stir Welding parameters that provide the best possible joint quality. The material used was an aluminium alloy, EN AW-3004 (AlMn1Mg1). Five butt joints were made with a self-developed, cylindrical, and tapered threaded tool with a rotational speed of 475 rpm. In order to compare the welding parameters, two more joints with a rotational speed of 475 rpm and seven joints with a welding speed of 300 mm/min with the use of a cylindrical threaded pin were performed. This involved a visual inspection as well as a tensile strength test of the welded joints. It was observed that the value of the material outflow for the joints made with the cylindrical threaded pin was higher than it was for the joints made with the tapered threaded pin. However, welding defects in the form of voids appeared in the joints made with the tapered threaded tool. The use of the cylindrical tool resulted in higher values for about 37% of mechanical properties compared with the highest result for the tapered threaded joint. As far as the parameters were concerned, it was concluded that most of the specimens were properly joined for a rotational speed of 475 rpm. In the joints made with a welding speed of 300 mm/min, the material was not stirred properly. The best joint quality was given for a rotational speed of 475 rpm as well as a variety of welding speed values between 150 and 475 mm/min.[4]
| Photo | Specimen No |
Welding Speed (mm/min) |
Rotation Speed (rpm) |
Tool Pin Shape | Ref. |
|---|---|---|---|---|---|
 |
CW1 | 300 | 115 | Cylindrical threaded | [4] |
| CW2 | 300 | 155 | Cylindrical threaded | [4] | |
| CW3 | 300 | 205 | Cylindrical threaded | [4] | |
 |
CW4 | 300 | 290 | Cylindrical threaded | [4] |
| CW5 | 300 | 360 | Cylindrical threaded | [4] | |
 |
CW6 | 300 | 680 | Cylindrical threaded | [4] |
| CW7 | 300 | 925 | Cylindrical threaded | [4] | |
| CR1 | 95 | 475 | Cylindrical threaded | [4] | |
| CR2 | 150 | 475 | Cylindrical threaded | [4] | |
| CR3 | 235 | 475 | Cylindrical threaded | [4] | |
| CR4 | 300 | 475 | Cylindrical threaded | [4] | |
| CR5 | 375 | 475 | Cylindrical threaded | [4] | |
| CR6 | 475 | 475 | Cylindrical threaded | [4] | |
| CR7 | 600 | 475 | Cylindrical threaded | [4] | |
 |
TR1 | 150 | 475 | Tapered threaded | [4] |
| TR2 | 235 | 475 | Tapered threaded | [4] | |
| TR3 | 300 | 475 | Tapered threaded | [4] | |
| TR4 | 375 | 475 | Tapered threaded | [4] | |
| TR5 | 475 | 475 | Tapered threaded | [4] |
1 mm thick 6061-T6
Yang Zhou and his colleagues chose three kinds of pins, to perform high rotation speed friction stir welding on a 1 mm thick 6061-T6 aluminium alloy in order to explore the influences of different pins on the weld based on the specialty of the aluminium alloy sheet welding. The microstructure and mechanical properties of the joints were analysed at the same time. When the rotation speed was 11,000 rpm and the welding speed was 300 mm/min, more sufficient stirring and a better joint (the tensile strength reaches 87.2% of the base metal) can be obtained with the pin design of a quadrangular frustum pyramid. The pattern of the weld cross section was a “flat T” and no obvious “S curve” was found in nugget zone (NZ). Heat affected zone (HAZ) and thermo-mechanically affected zone (TMAZ) were also narrow. The results demonstrate that the proportion of low angle boundaries in each area of the weld is lower than that of traditional Friction Stir Welding (FSW). The grain size of NZ is significantly refined and the proportion of low angle boundaries is only 20.1%, which have improved the welding quality.[5]
They selected three kinds of pins to perform high rotation speed FSW on a 1 mm 6061-T6 aluminum alloy sheet. Their conclusions were as follows:
- Sound welds can be obtained in 1 mm thick 6061-T6, if the shape of the pin is a quadrangular frustum pyramid, the rotation speed is 11,000 rpm and the travel speed is 300 mm/min.
- Due to the stirring effect of high rotation speed, the proportion of low angle boundaries in all zones is lower than that of the traditional FSW, while the average grain size is similar to traditional FSW.
- The proportion of low angle boundaries in HAZ, TMAZ, and NZ is 50%, 23.3%, and 20.1%, respectively.
- The tensile strength of specimen W2 is 265 MPa, which accounts for 87.2% of the base metal.
- The pattern of the weld cross section is “flat T”.
- HAZ and TMAZ are narrow and no obvious “S curve” is found in the weld, which is different from the traditional FSW.
| Photo | Specimen No |
Welding Speed (mm/min) |
Rotation Speed (rpm) |
Tool Pin Shape | Comment | Ref. |
|---|---|---|---|---|---|---|
 |
(a) | 300 or 400 | 11,000 | S2: quadrangular frustum pyramid | Smooth | [5] |
 |
(b) | 200 | 11,000 | S1: quadrangular prism | Flash and groove | [5] |
 |
(c) | 500 | 11,000 | S3: frustum | Groove | [5] |
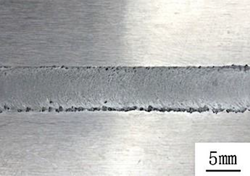 |
(d) | 200 | 11,000 | S2: quadrangular frustum pyramid | Rough | [5] |
Dissimilar materials: 3mm thick Al 7075-T6 to pure copper
Surface morphology and tunnel void defects in Bobbin FSW of layered plasticine

Abbas Tamadon, Dirk J. Pons and Don Clucas of Department of the Mechanical Engineering, University of Canterbury in Christchurch, New Zealand investigated the potential position for tunnel defects within the structure of bobbin-tool friction stir welds by analogue modelling, to explain the origins of the formation mechanism of a typical tunnel void in the weld region. The welding process was simulated on layered plasticine slabs instead, compared to the aluminum plates. Observations in the modelled structure showed a high possibility for a continuous channelled discontinuity, like a tunnel-shaped void defect, in the entry zone of the weld, which mirrors the metal welding. The anatomy of tunnel defect in the entry zone was explained according to the mechanics of material during the plastic deformation process.
Instead of aluminum plates, analogue modelling of FSW was performed using colored layers and grids of plasticine. This provides easier flow visualization compared to the metallographic measurements of the aluminum welds. The objective is to see if it is possible to replicate the defect structures known to exist for aluminum plate welding. By fabrication of a plate comprising multiple layers of different colors, external area examination during and after the bobbin-tool FSW process, and subsequent post processing by cutting and viewing the cross-sections, can provide new insights into a flow-based model for the weld process.[7]

For better visualization of the welding process, multi-layered plasticine slabs were used as the weld workpieces. Different colors of plasticine manufactured by New Clay Products–(Gordon Harris Ltd., London, UK), were rolled to a uniform thickness of approximately 1.25 mm by a cylinder-shaped roller and using glycerine as the lubricant. Layers of different colors of plasticine were stacked on top of each other to create the test piece thickness of 10 mm. The slabs were subjected to heat treatment to improve the adhesion between the layers and also to diffuse the remained glycerine between the layers. The blocks were held at a temperature of 60 °C for a period of two hours. The hot blocks of plasticine cooled gradually to −4 °C as it was used for the processing in the room temperature. To validate the plasticine analogue, an aluminum plate also was welded by a Bobbin tool made from H13 tool steel.
They used a 3D printed Bobbin tool made from plastic with the same geometry features that those of an H13 steel tool used for aluminium welding, to visualize deformation and joining of the material in an analogue model. The trials used a CNC milling machine (OKUMA, MX-45VAE Model, Oguchi Plant, Aichi, Japan). The weld workpieces were rigidly fixed between clamped bars and care was taken to ensure that no lateral movement during work occurs. Based on prior experimentation, to achieve a uniform welded joint, the welding parameters, rotational speed (ω), and feeding rate (V), were selected in a range sufficient for the establishment of a bonded weld. In this regard, the plasticine analogue samples were processed under welding speed set of (ω = 50 rpm, V = 50 mm/min), as these were the minimum speeds of the milling machine. The aluminum sample was processed under speeds of (ω = 650 rpm, V = 400 mm/min). There was also a difference in the thickness of the workpieces, because of the limitation of the material instability under the processing condition. While the aluminum plate shows suitable processing in 6 mm thickness, the thickness of the analogue slabs increased to 10 mm to improve the stability of the layered plasticine during the process.
They concluded that the method is applicable to identify the flow characteristic of the weld and present probable formation mechanism of the discontinuity defects for the processed material. The reported results point out a very strong model based on the flow visualization by the plasticine analogue during the friction stir welding process. Results show that the main reason for the tunnel defect is the instability of the plastic deformation during the entering of the tool into the body of the workpiece material at the entry zone. This highly plastic embedding occurs with the ejection of material as a spray in the entry zone of the weld and consequently, the tunnel defect is left in the place of the material loss. By identification of the origins of the void formation, it was concluded that a defect-free weld should be able to establish the uniform flow integrity within the stirring zone. This can result in a stable mass refilling process at the trailing edge of the tool, where the mass deposition forms the weld seam with no discontinuity flaw within the bonding layers.[7]
More photos required, please
We are currently searching for photos of the surfaces of friction stir welds, ideally made at five different welding conditions:
- Far too cold (generating surface void and risk of shearing off the pin) - welding speed much too fast and rotation speed much too low
- Too cold (an internal void can be assumed from looking at the surface) - welding speed too fast and rotation speed too low
- Just right - optimised welding conditions to achieve high-strength welds
- Too hot (uneven surface) - welding speed too slow and rotation speed too high
- Far too hot (blisters and a lot of flash) - welding speed much too slow and rotation speed much too high
We want to use them to train an automated image processing system to detect wrong parameters and re-adjust them either during welding or before making the next weld.
See also
References
- ↑ 1.0 1.1 1.2 1.3 1.4 1.5 1.6 Mohamed M. Z. Ahmed, Waheed S. Barakat, Abdelkarim Y. A. Mohamed 3, Naser A. Alsaleh and Omayma A. Elkady: The Development of WC-Based Composite Tools for Friction Stir Welding of High-Softening Temperature Materials. Metals 2021, 11, 285, https://doi.org/10.3390/met11020285, CC BY 4.0.
- ↑ ISO 25239-5:2020(en) Friction stir welding — Aluminium — Part 5: Quality and inspection requirements.
- ↑ Photos and information provided by Christian S. Paglia, Director of the Institute of Materials and Construction, Supsi, Switzerland.
- ↑ 4.00 4.01 4.02 4.03 4.04 4.05 4.06 4.07 4.08 4.09 4.10 4.11 4.12 4.13 4.14 4.15 4.16 4.17 4.18 4.19 Anna Janeczek, Jacek Tomków, and Dariusz Fydrych. 2021: "The Influence of Tool Shape and Process Parameters on the Mechanical Properties of AW-3004 Aluminium Alloy Friction Stir Welded Joints." Materials 14, no. 12: 3244. https://doi.org/10.3390/ma14123244
- ↑ 5.0 5.1 5.2 5.3 5.4 Yang Zhou, Shujin Chen, Jiayou Wang, Penghao Wang and Jingyu Xia: Influences of Pin Shape on a High Rotation Speed Friction Stir Welding Joint of a 6061-T6 Aluminum Alloy Sheet. Metals 2018, 8(12), 987; DOI:10.3390/met8120987. CC BY 4.0.
- ↑ 6.0 6.1 Çakan, A., Ugurlu, M., Kaygusuz, E. (2019): Effect of weld parameters on the microstructure and mechanical properties of dissimilar friction stir joints between pure copper and the aluminum alloy AA7075-T6. Materials Testing 61(2):142-148 DOI: 10.3139/120.111297.
- ↑ 7.0 7.1 7.2 7.3 Abbas Tamadon, Dirk J. Pons and Don Clucas: Structural Anatomy of Tunnel Void Defect in Bobbin Friction Stir Welding, Elucidated by the Analogue Modelling. Department of Mechanical Engineering, University of Canterbury, Christchurch 8140, New Zealand. Appl. Syst. Innov. 2020, 3, 2; doi:10.3390/asi3010002.
